🍳머리말
k8s 외부에서 client-go를 이용해 pod에 직접 접근해 내부 container에 있는 terraform cli를 실행해 ec2 instance를 띄우는 예제입니다. {}로 감싸진 부분은 직접 입력해야하는 부분도 있습니다.
📕Prerequisite
📔 go v1.17+
📔 k8s cluster
📔 k8s cluster 내 ~/.kube/config 정보
📔 docker
📔 docker hub 계정
📔 aws console 계정
📔 terraform cli
📕 Terraform cli 설치
ubuntu를 base image container를 사용할 것이므로 cli를 ubuntu용으로 받아줍니다.
https://www.terraform.io/downloads
📕hcl file 작성
작업 folder terraform을 만들어 하위에 여러 file들과 folder를 작성해줍니다.
📔 network 정의
terraform folder하위에 ec2 instance를 띄우기 위해 network-configs라는 folder를 만들어 resource들을 정의해주는 file들을 작성합니다.
📑 gateway.tf
resource "aws_internet_gateway" "test-gateway" {
  vpc_id = "${aws_vpc.test-vpc.id}"
tags = {
    Name = "test-gateway"
  }
}
📑 output.tf
output "test-subnet-a-id" {
  value = "${aws_subnet.test-subnet-a.id}"
}

output "test-sg-id" {
  value = "${aws_security_group.test-sg.id}"
}
📑 routes.tf
resource "aws_route_table" "test-route-table" {
  vpc_id = "${aws_vpc.test-vpc.id}"
  route {
    cidr_block = "0.0.0.0/0"
    gateway_id = "${aws_internet_gateway.test-gateway.id}"
  }
  tags ={
    Name = "test-route-table"
  }
}

resource "aws_route_table_association" "my-subnet-association" {
  subnet_id      = "${aws_subnet.test-subnet-a.id}"
  route_table_id = "${aws_route_table.test-route-table.id}"
}
📑 security-group.tf
resource "aws_security_group" "test-sg" {
  vpc_id      = "${aws_vpc.test-vpc.id}"
  name        = "test-sg"
  description = "This security group is for Terraform Test"
  tags ={ Name = "test-sg" }
}
📑 sg-rules.tf
resource "aws_security_group_rule" "test-cluster-traffic" {
  type              = "ingress"
  from_port         = 0
  to_port           = 0
  protocol = "-1"
  cidr_blocks       = ["10.0.0.0/16"]
  security_group_id = "${aws_security_group.test-sg.id}"
}

resource "aws_security_group_rule" "instance-ssh" {
  type              = "ingress"
  from_port         = 22
  to_port           = 22
  protocol = "TCP"
  cidr_blocks       = ["0.0.0.0/0"]
  security_group_id = "${aws_security_group.test-sg.id}"
}

resource "aws_security_group_rule" "outbound-traffic" {
  type              = "egress"
  from_port         = 0
  to_port           = 0
  protocol          = "-1"
  cidr_blocks       = ["0.0.0.0/0"]
  security_group_id = "${aws_security_group.test-sg.id}"
}
📑 vpc-subnet.tf
resource "aws_vpc" "test-vpc" {
  cidr_block = "10.0.0.0/16"
  tags = {
    Name = "test-vpc"
  }
}

resource "aws_subnet" "test-subnet-a" {
  vpc_id = "${aws_vpc.test-vpc.id}"
  cidr_block = "10.0.1.0/24"
  availability_zone = "us-east-2a"
}
📔 provider 정의
access key와 secret key가 필요합니다.
https://docs.aws.amazon.com/ko_kr/powershell/latest/userguide/pstools-appendix-sign-up.html
AWS 계정 및 액세스 키 - AWS Tools for PowerShell
이 페이지에 작업이 필요하다는 점을 알려 주셔서 감사합니다. 실망시켜 드려 죄송합니다. 잠깐 시간을 내어 설명서를 향상시킬 수 있는 방법에 대해 말씀해 주십시오.
docs.aws.amazon.com
해당 방법을 통해 자신의 계정의 key id들을 확인할 수 있습니다. 해당 값을 메모장에 저장해 둡니다.
이 후 terraform folder 하위에 알아낸 key값을 넣어 아래 file을 적절히 변형해 작성해줍니다. provider의 region값은 편의상 us-east-2로 고정해 두었습니다.
📑 aws-provider.tf
provider "aws" {
  access_key = "ACCESS KEY 값"
  secret_key = "SECRET KEY 값"
  region     = "us-east-2"
}

module "aws-network-configs" {
  source = "./network-configs"
}
📔 필요 key 정의
tls private key, aws key pair를 정의하기 위한 resource들을 작성해줍니다.
📑 key.tf
resource "tls_private_key" "example" {
  algorithm = "RSA"
  rsa_bits  = 4096

  provisioner "local-exec" {
    command = "echo '${self.private_key_pem}' > ./aws-key.pem"
  }
}

resource "aws_key_pair" "terraform-key" {
  key_name = "aws-key"
  public_key = "${tls_private_key.example.public_key_openssh}"
}
📔 instance 정의
aws instance를 정의해줍니다. t2.micro와 특정 ami를 사용해 만들 것입니다. resource 명은 ubuntu-ssh-server로 설정했습니다. instance이름은 test-instance로 설정했습니다.
variable "key_pair" {
  default = "aws-key"
}

resource "aws_instance" "ubuntu-ssh-server" {
    ami = "ami-0b9064170e32bde34"
    instance_type = "t2.micro"
    subnet_id = "${module.aws-network-configs.test-subnet-a-id}"
    vpc_security_group_ids = [
        "${module.aws-network-configs.test-sg-id}"
    ]
    key_name = "${var.key_pair}"
    count = 1
    tags ={
        Name = "test-instance"
    }
    associate_public_ip_address = true
}
📕image 생성
📔 Dockerfile 작성
ubuntu를 base image로 설정했습니다. 따라서 linux용으로 terraform cli를 download 해줍니다. 이후 curl을 download했습니다. 이는 terraform core와 registry가 통신 시 tls를 사용하는데 ubuntu가 terraform registry가 보낸 tls를 신뢰하도록 채conatiner 내에 tls file을 받기 위해서 curl을 설치해주는 것입니다. 이후 작성했던 file들을 copy해주고 curl을 실행해 원격으로 terraform provider tls를 받아줍니다.
📑 Dockerfile
FROM ubuntu
RUN apt-get update && apt-get install -y curl

COPY ./terraform /
COPY ./terraform-hcl/network-configs /network-configs
COPY ./terraform-hcl/aws-provider.tf /
COPY ./terraform-hcl/instance.tf /
COPY ./terraform-hcl/key.tf /
CMD curl -v https://releases.hashicorp.com/terraform-provider-tls/0.1.0/terraform-provider-tls_0.1.0_SHA256SUMS && tail -f /dev/null
해당 image를 build 후 원하는 docker hub repository로 push해줍니다.
제 경우는 다음과 같은 명령어를 사용했습니다.
📔 image build
docker build -t {docker hub 계정}/{docker hub repo 명}:{tag} .📔 image push
docker push {docker hub 계정}/{docker hub repo 명}:{tag}📕Pod 배포
📔 k8s cluster환경에 배포
cluster의 master node에 pod.yaml을 작성한 뒤 배포해줍니다. 이 때 만든 image를 사용합니다.
📑 pod.yaml
apiVersion: v1
kind: Pod
metadata:
  name: terraform-pod
spec:
  containers:
  - name: terraform
    image: {docker hub 계정명}/{docker hub repo명}:{tag}
    imagePullPolicy: Always
📕go file 작성 후 실행
📔 go script 작성
📑 main.go
package main
import (
"bytes"
"context"
"encoding/json"
"fmt"
"io"
corev1 "k8s.io/api/core/v1"
v1 "k8s.io/apimachinery/pkg/apis/meta/v1"
"k8s.io/client-go/kubernetes"
"k8s.io/client-go/tools/clientcmd"
"k8s.io/client-go/tools/remotecommand"
"k8s.io/kubectl/pkg/scheme"
)
func jsonPrettyPrint(in string) string {
var out bytes.Buffer
err := json.Indent(&out, []byte(in), "", "\t")
if err != nil {
return in
}
return out.String()
}
func main() {
var stdin io.Reader
var cmd = [] string{"/bin/bash", "-c", "./terraform init && ./terraform apply -auto-approve"}
//var cmd = [] string {"/bin/bash", "-c", "./terraform destroy -auto-approve"}
var out io.Writer
var stdout, stderr bytes.Buffer
enc := json.NewEncoder(out)
enc.SetIndent("", " ")
// kubeconfig에서 현재 콘텍스트를 사용한다
// path-to-kubeconfig -- 예를 들어, /root/.kube/config
config, _ := clientcmd.BuildConfigFromFlags("", "{config file 위치}")
// clientset을 생성한다
clientset, _ := kubernetes.NewForConfig(config)
// 파드를 나열하기 위해 API에 접근한다
pods, _ := clientset.CoreV1().Pods("mskim").List(context.TODO(), v1.ListOptions{})
fmt.Printf("There are %d pods in the cluster\n", len(pods.Items))
terraformPod, _ := json.Marshal(pods.Items[{몇 번째 pod인지}])
fmt.Printf("items", jsonPrettyPrint(string(terraformPod)))
//pod실행 option을 결정한다
option := &corev1.PodExecOptions{
Container: "terraform",
Command: cmd,
Stdin: true,
Stdout: true,
Stderr: true,
TTY: false,
}
if stdin == nil {
option.Stdin = false
}
//요청할 pod, namespace를 지정한다
req := clientset.CoreV1().RESTClient().Post().Resource("pods").Name("terraform-pod").
Namespace("{namespace명}").SubResource("exec")
req.VersionedParams(
option,
scheme.ParameterCodec,
)
exec, err := remotecommand.NewSPDYExecutor(config, "POST", req.URL())
err = exec.Stream(remotecommand.StreamOptions{
Stdin: stdin,
Stdout: &stdout,
Stderr: &stderr,
})
if err != nil{
fmt.Println(err)
}
//명령어 실행 결과를 출력한다.
fmt.Println(stdout.String(), stderr.String())
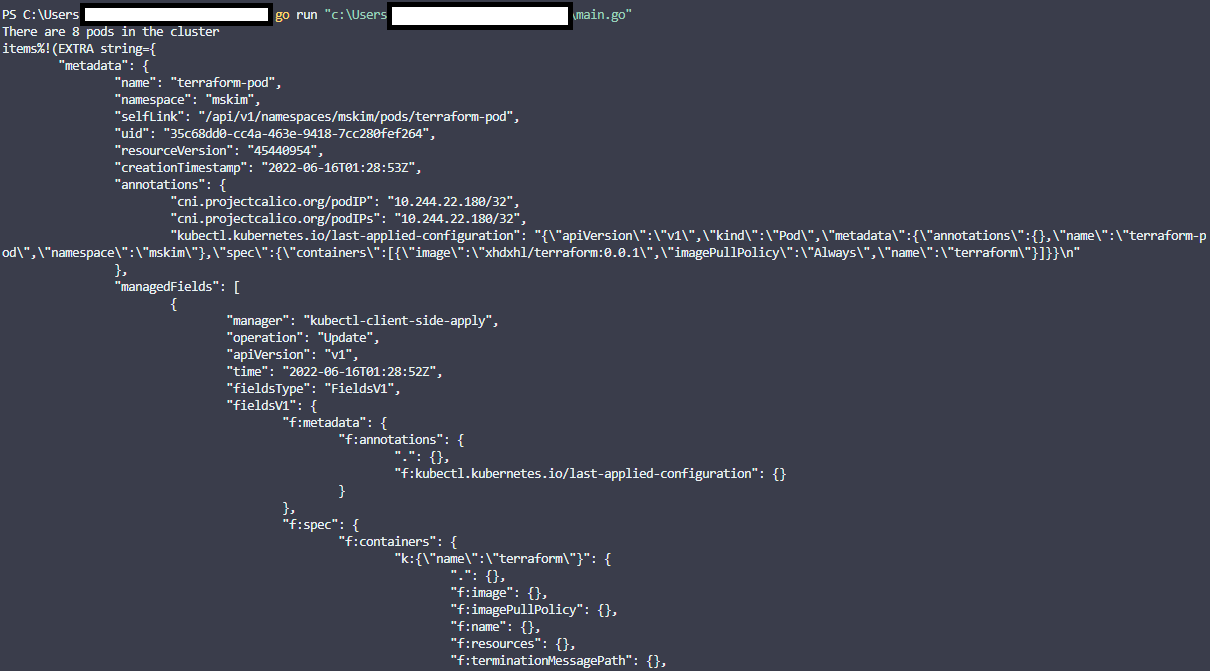
}k8s cluster정보가 포함된 config file을 불러와 사용자 객체를 생성한 후 cluster에 접근합니다. 이후 mskim이라는 namespace의 resource들 중 terraform이 떠 있는 pod.Items[7]번째에 접근해 pod의 정보를 출력합니다. 또한 container에 terraform 명령어를 실행해 실제 ec2 instance를 띄우게 되며 그 결과를 출력하게 됩니다.
📔 go script 실행
go run main.go📔 go script 결과
📑 pod의 개수와 정보가 출력된 모습
📑 이후 terraform init으로 plugin을 받고 instance를 띄운 결과가 출력된 모습


📑 실제 aws console에서 확인된 모습

*더 나은 내용을 위한 지적, 조언은 언제나 환영합니다.